Give Me Some Sugar!

Science Experiments

For this week’s Scientific Reasoning, I want to talk to you about growing crystals. It seems fitting since last week’s feature was an Interview with Dr Julia Archbold who worked with protein crystals.

I work with some scientists who are protein crystallographers. These talented individuals isolate a particular protein and then work out how to grow it in crystal form. Once they’ve grown the crystals, they’re able to use x-ray beams to determine the structure of that protein. This gives the scientists a lot of information about how that protein works in the body, and how it interacts with other proteins and molecules. This is very important for studying diseases, how they work and how to treat and cure them.

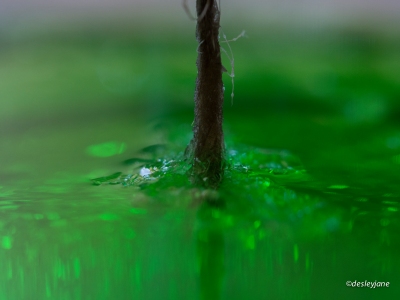
Today’s experiment is to grow some crystals of our own. I’m going to show you how to grow sugar crystals, but you can also grow salt crystals as well using the same method. Sugar gives you bigger crystals that are easier to see. This experiment is not a quick one. It’s quite quick to set up, but the crystals take a few days to fully form. I actually left this one working away for a few weeks, I was fascinated with the crystal structures and (you know me!) photographing them as often as I could.


What will you need?

Ingredients (Sugar).


  • 1 cup water
  • 3 cups table sugar
  • food colouring (if you want)
  • clean glass jar
  • pencil
  • string (hairy string is best – mine is jute string)
  • saucepan to boil water
  • spoon


What will you do?

  1. In the saucepan, start boiling the water.
  2. Stir in the sugar, one spoonful at a time. The idea is to dissolve as much sugar as possible in the water. As soon as no more will dissolve, stop adding. There should be no undissolved sugar in the pan. This is the most difficult part of the process to get right.
  3. Add a few drops of food colouring if you wish, and stir through.
  4. Tie the string to the centre of the pencil – the string should be able to reach into the liquid but not touch the bottom.
  5. Let the sugar solution cool slightly, then dip the string into the solution to wet it and take it out again.
  6. Carefully pour the solution into the clean glass jar.
  7. Place the pencil on top of the jar. I taped the pencil into place. Remember that the string should dip into the solution but not touch the bottom of the jar.
  8. Place the jar somewhere that it won’t get bumped, but where you and the children can check on it daily.
  9. Enjoy! This is one experiment that you CAN eat ๐Ÿ™‚


What will you learn?

  • As the water evaporates from the string, tinyย sugar crystals will form on the string. The tiny crystals then provide a surface for growing more crystals (this is called seeding).
  • By dissolving sugar in hot water until no more will dissolve, you have created a super-saturated solution. Hot water can hold more sugar than cold water. As it cools, the solution can’t hold the same amount of sugar anymore, so it has to come out of the solution and it forms crystals. This process is called precipitation (just like rain, only in this case, it’s a solid).
  • On the other hand, as time passes, the water starts to evaporate. The sugar does notย evaporate, so instead the remaining solution gets more and more concentrated in terms of sugar content. As we now know, the water can’t hold any more sugar, so if there’s less water, the sugar has to come out of solution (or precipitate).


Some tips.

  • This should be done slowly. The slower the better – this causes larger crystals to grow, so they’re easier to see. If you quickly cool the solution in the fridge, the crystals will be much smaller.
  • It’s best not to boil the sugar, if it gets too hot, then it might form a soft toffee – this happened to mine the first time, so I had to add more water and warm it again to dissolve the toffee. I also poured some into patty papers to eat later ๐Ÿ™‚
  • Did you know that brown sugar is just white sugar that hasn’t been fully purified? There are still some impurities in the sugar, which gives it its colour. If you use brown sugar, this experiment probably won’t work.
  • If you can’t see any crystals growing on the string after 24 hours, pop the solution back in the saucepan and bring it to the boil, then pour it back into a clean jar.
  • The jar needs to be clean. Crystals like to grow on something that is already there – that’s why we’re using the hairy string. If there is dirt in the jar, the crystals will probably grow on the dirt and not up the string. The dirt acts as a “seed” for the crystals to grow on.

x desleyjane


Safety Considerations.

  • Boiling water should be handled by an adult.
  • Once the sugar is dissolved, it will be extremely hot. I recommend not letting the children near it until it cools.


Comments

30 responses to “Give Me Some Sugar!”

  1. gfchopstix Avatar

    That’s so cool! Love the colour too ๐Ÿ™‚ Is it like rock candy?

    Liked by 1 person

    1. desleyjane Avatar

      Yup, it’s basically rock candy. You can flavour it if you want as well. This has been one of my favourites so far!

      Liked by 1 person

      1. gfchopstix Avatar

        I’ll have to give it a try ๐Ÿ˜‰

        Liked by 1 person

  2. Ben Rowe Aperturef64 Avatar

    definitely going to do this and then whip out my macro gear to get in close to the crystals. Cool idea.

    Liked by 1 person

    1. desleyjane Avatar

      Thanks Ben, can’t wait to see the results!

      Like

  3. Victo Dolore Avatar

    One of my favorite things to do with kids. Eating them afterward makes it doubly fun! (We also use salt and borax and alum but we don’t eat those!)

    Liked by 1 person

    1. desleyjane Avatar

      LOL. Nice one ๐Ÿ˜„ I admit I did taste this one, yum!

      Liked by 1 person

  4. Faraday's Candle Avatar

    Isn’t this fun. Oh sugar! Your photos are awesome.

    Liked by 1 person

    1. desleyjane Avatar

      Oh thank you! I think this one was the most fun! It was a few weeks to get those big crystals at the end. Actually the jar is still on my bench and the liquid is almost all crystallized now!

      Liked by 1 person

  5. Norm 2.0 Avatar

    Nice warnings at the end. Want to come write woodworking machinery operator’s manuals with me?
    ๐Ÿ˜‰

    Liked by 1 person

    1. desleyjane Avatar

      LOL thanks Norm. That could be fun!

      Like

  6. Andy Townend Avatar

    What an awesome post. Beautiful photos, great writing and you have made me actually remember my studies in Chemistry at University, where I was always pretty useless at the practical side ๐Ÿ˜‰

    Liked by 1 person

    1. desleyjane Avatar

      Fabulous! Thanks Andy, I’m so glad you liked it. I absolutely loved photographing these, so much fun. X

      Liked by 1 person

      1. Andy Townend Avatar

        They really are excellent photos!

        Liked by 1 person

        1. desleyjane Avatar

          Cheers Andy โ˜บ๏ธ

          Liked by 1 person

  7. LifestyleswithLia Avatar
    LifestyleswithLia

    This is so cool! It’s a perfect snow day project with kids! Your photos are great, how they capture each step of the process!
    Super crystals from a super scientist!

    Liked by 1 person

    1. desleyjane Avatar

      Aw thanks Lia, I appreciate you saying so โ˜บ๏ธ

      Liked by 1 person

  8. emmanique Avatar

    Reading this I had two memories pop up. The first one was when you where describing protein crystals and x-Ray I got a vivid memory of big sis excitedly telling me in detail about D1 proteins (she has a PhD in it now). The second one was of my grandmother teaching me to make toffee I was 5 and had to stand on the stove box my grandfather made so us girls could reach the stove to help out in Jam Season.

    Liked by 1 person

    1. desleyjane Avatar

      Oh cool, smart sis ๐Ÿ˜ƒ
      I accidentally made toffee LOL, too much sugar in the pot!

      Like

  9. Amy Sampson Avatar

    I did this one in grade 7 science class. It was my favourite experiment of the year. Actually, it was my favourite lab experiment of all my school years. ๐Ÿ™‚

    Liked by 1 person

    1. desleyjane Avatar

      It was lots of fun!

      Liked by 1 person

  10. eclecticoddsnsods Avatar

    What a great post and reminds me to look at th eother experiment which iw as going to do this half term which is this week coming. Are you categorising these experiments separately? I think i will have to go and take a look you will have a following of mums to keep their kids occupied hehe x ps wonderful shots too xx Happy Valentines x

    Liked by 1 person

    1. desleyjane Avatar

      Happy Valentine’s Day!
      Yes, there’s a menu item called Scientific Reasoning, and the Experiments are in there.
      XOX

      Liked by 1 person

      1. eclecticoddsnsods Avatar

        oooh i will make sure to take a peek x

        Liked by 1 person

  11. luciledegodoy Avatar

    I loved this experiment. You wrote it so well, and the photos are wonderful. I am ending this seres very much! Way to go, Dr. DJ! Brilliant.

    Liked by 1 person

    1. desleyjane Avatar

      Oh thanks dear, my favourite one so far to photograph. It’s still sitting on my kitchen bench at home drying out. I will take a couple of final shots before I close it down. X

      Liked by 1 person

      1. luciledegodoy Avatar

        Publishing it later?

        Liked by 1 person

        1. desleyjane Avatar

          Oh most likely ๐Ÿ˜‰๐Ÿ˜‰

          Liked by 1 person

  12. afairymind Avatar

    What a great little experiment. And edible too! I might have to try this out. ๐Ÿ™‚

    Liked by 1 person

    1. desleyjane Avatar

      Please do! Would love to hear your results!

      Liked by 1 person

I’d love to hear from you!